
FAQs
One of the things we pride ourselves on here at On The Level is helping our customers solve problems, whether you are a builder, architect, interior designer, contractor, showroom or end user.
This page takes you through some of the common issues you have faced and asked us about recently in terms of wet room installation alongside some answers which we hope will help those of you who have similar questions. As always, please just give us a call if there’s a specific question you have that’s not answered here; we’re always happy to help whether you are an existing customer or not.
Sizes
Why should you try to make the shower former as large as possible?
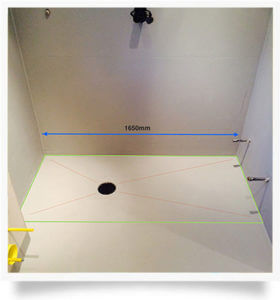
Unlike with traditional shower trays, the benefit of a concealed shower former is that – if you have the space in the room – you’re able to maximise the showering area without the need for a shower enclosure. Though a 900mm x 900mm former would have been fine in the image displayed, it’s even better to utilise the space by increasing the former to the full width of the alcove – 1650mm. This will capture and drain the water that would have splashed beyond the original 900mm x 900mm area.
What is the smallest wet room you can have?
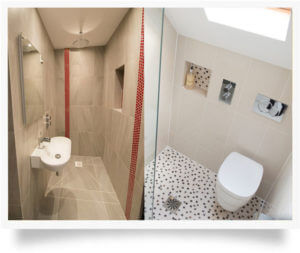
Wet rooms utilise space. It really doesn’t matter what size room you’re faced with. Whether a standard sized bathroom or a small en-suite conversion, it all depends on how much of that room gets wet whilst showering and how much you mind. Consider this: if a wall-hung toilet is in a 1.5m x 1.5m room, is it going to be a pain for you if it gets wet? OTL have produced bespoke formers smaller than this size. It’s all down to personal preference. There is no room too big or too small that prevents you from having a wet room. In Visual Series 1 is an en-suite conversion which is narrow and long . Visual Series 2 shows another small en suite with a pitched ceiling, with the whole floor to a gradient allowing water to run / drain regardless of where it lands on the floor.
Standard Sizes
The standard sizes for showering areas are 1200mm x 1200mm, 1200mm x 900mm and 1500mm x 900mm. Also, 1700mm x 800mm is a popular size when replacing a bath with a shower area.
If you have a compact bathroom and you are thinking of creating a small square shower area, a former is available as small as 800mm x 800mm. With a shower area of this size, a simple glass enclosure should be installed to contain any splashing.
Creating a minimalist wet room without a screen
To create a luxury, minimalist wet room without a screen, the recommended size of a showering area is 1500mm x 1500mm or larger. However, this can depend on the type of showerhead being used and whether or not the shower area will include body jets which spray horizontally. Bear in mind that whilst the shower is in use excess water will splash outside the immediate showering area. This is not a problem if it is caught within the area of the former as water on the gradient will flow towards the waste outlet. If the water falls on a flat floor surface around the edge of the former, then it may sit and not drain away. So, always make sure that the fall area, i.e. former, extends to a suitable size.
Wet Rooms v’s Shower Trays
Why are wet rooms more secure than shower trays?
For many years there has been scepticism as to how secure a wet room actually is in terms of water tightness. People have been concerned about potential leakages and have nightmares of water gushing through the ceiling. In fact, when installing a wet room shower a membrane is created over the complete floor area and at intersections where the floor meets the wall a solid rubber waterproof tape is installed. Gaps or seams in the floor are all covered with tanking tape as well as preformed internal, making the wet room completely watertight.
No step
Wet rooms are completely level access, with no step or trip hazard in sight. This makes it the ideal bathroom solution for all generations or mobility levels.
Aesthetics
Continue your chosen flooring throughout the entire bathroom, for a luxurious design led feel to the room.
Wet Room Hints & Tips
What’s best practice for grouting?
Ensure that you maintain an even 2/3mm grout line throughout, including (and more importantly) any mitre cuts and around wall joins; anything below this standard will make it difficult to fill the void with a flexible grout, therefore risking the chance that this will allow water to penetrate below your tiles.
What sort of maintenance do wet rooms need?
Aftercare maintenance of your wet room is something many people don’t think about. We strongly recommend that you clean your shower gully once a month to remove any unwanted items such as hair that may cause a block further down the line. By simply using hot water from your shower you can clean your trap by removing your grating or cover plate along with the dip tube and beaker and washing all components before re-installing.
Why is flow rate important?
It is always worth checking the flow output of your shower head, especially if you have a handheld shower and or body jets in addition. The flow rate of traps varies from 10Lpm up to 50Lpm.
Why does size matter?
Size of shower area; unless you are fully enclosing your proposed wet area it is recommended that you maximise the size of your sloped shower area in order to help contain the water. If using a single fixed panel or splash panel it is worth exceeding the sloped area beyond the screen in order to help contain the flow of water.
Positioning of a wet room
Another consideration when planning a wet room is the position of it in the room. A bathroom does not have to have the wet room in the corner as is traditional with shower enclosures. An OTL wet room can be installed along a wall, in the centre of a room or at right angles to the wall. There are many options and you can be creative with design.
Trimmable Formers
OTL formers can be trimmed by up 50mm without affecting the fall gradients. This is useful as it allows you to move the waste position if it collides with any under floor obstructions. However, this will affect the overall size of the former. The best approach is to measure up accurately before ordering and for unusually large and awkward shapes OTL recommend their bespoke service which will ensure that the waste is positioned accurately.
Tanking and Waterproofing
What is tanking?
Obviously it is critically important to create a 100% waterproof barrier, so maximum consideration needs to be given to waterproofing – known as ‘tanking’ – the wet room. The OTL tanking system helps you achieve a watertight environment, through applying a liquid that once cured creates a flexible waterproof membrane on floors and walls.
Compatibility and application
It can be applied to wood, plasterboard, MDF, concrete screed and most commonly used construction boards. Once applied, the OTL tanking system can resist normal movement in the room and will not become brittle with age. As it is water based, it is non-sticky and is easily applied with a brush or roller. The tanking kit contains everything to get you to tiling stage and has enough liquid to cover 8m². Should you need internal or external preformed corners these can be supplied separately. The OTL tanking system is compatible with all under floor heating.
Common Do’s & Don’ts
Protecting the area / seal around the gully
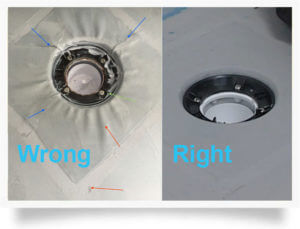 Protecting the area / seal around the gully is very important. Note the differences between the wrong and right images. Key mistakes are illustrated with arrows. The blue arrows indicate where the outlet sleeve must have been cut in three places. The red arrows indicate that the outlet sleeve has bubbled and there’s air underneath, plus the meshed perimeter edge has not been bedded in the tanking compound. Additionally, the temporary cover plate has not been used to protect the gully from dust and debris.
The ‘right’ image shows the outlet sleeve has been properly bedded down and allowed to dry before fitting the clamping ring to the gully. The sleeve is torte with no air bubbles, preventing any easy penetration.
Mistakes when tanking
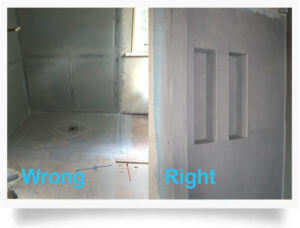
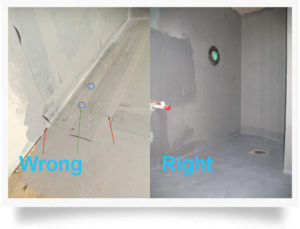 The red arrows in the ‘wrong’ image point to seams which should be covered by the tanking tape. The arrow on the left shows how the tape does not run along the whole floor wall intersection. The green arrow with small blue circle shows the screws protruding above the floor deck. Screws should be countersunk flush with the top surface. The ‘right’ image shows a completely tanked wet room ready for tiling. The surface is smooth with all tanking tape overlapped, creating a full seal of the wet room floor. In this case the complete wall has been tanked for extra security, although OTL generally recommended tanking to a minimum 1000mm up the walls in the shower area.
Uneven floor levels
 The red arrow in the ‘wrong’ image shows where the floor levels are uneven, which can affect the gradient making tiling more difficult. The existing floor outside the showering area should be level with the 24mm former. The blue arrow in the ‘right’ image shows the floor is completely even underneath the tanking tape.
Whole Floor
What is a OTL Complete system?
If you require both former and floor area, we can supply the complete floor including the showering area, with the OTL Complete wet room flooring system. This innovative made-to-measure interlocking flooring system incorporates a bespoke showering area with a choice of waste position.
The system is compatible with all OTL drain and grating designs.
Most types of floor construction are fine for the system including suspended timber floors, block and beam, TJI joists and cassette floors.
The interlocking flooring system is suitable for vinyl sheet flooring or a tiled wet room floor so it is ideal for bathrooms, shower areas and general utility areas in sports clubs, hotels, pod modules, new builds, residential homes and other local authority buildings, as well as renovations, refurbishments and alterations.